이야기를 하기에 앞서, 이 글은 네가지 파트로 나뉘어져 있습니다. 각 글을 나눈 기준은 제가 항상 Flutter로 개발하면서 작업을 나누는 단위입니다. 각 단위 내에서도 더 작게 쪼개지지만 플랫폼 관련 기능을 구현할 때는 Flutter -> iOS -> Android 순서로 작업합니다. (Android보다 iOS쪽이 제약이 많기 때문에 기능 확인차 이렇게 하고있습니다.)
프로젝트 열기
필자는 Flutter plugin을 개발할 때 난관이 “어느 프로젝트를 열어야 하는거지?” 였다. 그냥 Flutter에서 생성해준 디렉토리 내에서 ios 폴더를 들어가 보면 Runner가 없을 뿐더러 Runner.xcworkspace 파일도 없었다…!!
이전 글에서 얘기했듯이 example 내부의 iOS 프로젝트를 열어서 개발해야한다!
이전 글에서 example 폴더에서 flutter build iOS —no-codesign 명령어를 실행 시켜 줬었는데, 이때 example/ios 디렉토리에 있는 Runner.xcworkspace를 xcode로 열어준다. open example/ios/Runner.xcworkspace
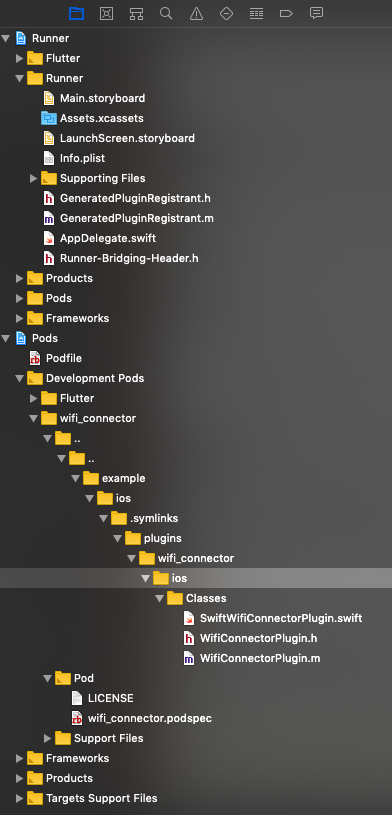
백문이 불여일견! xcode로 example ios 프로젝트를 열었을 때의 directory tree를 살펴보자
크게 두개의 프로젝트가 있다. Runner와 Pods
Runner는 우리 어플리케이션의 내부적인 이름입니다.
Pods
Pods는 cocoapods에서 다운받은 라이브러리를 관리하는 프로젝트이다.
우리의 flutter plugin 프로젝트는 iOS쪽에서 본다면 “cocoapods에 올라가있는 라이브러리”로 해석 할 수 있다.
우리가 중점적으로 봐야할 것은 Development Pods이다.
wifi_connector/../../example/ios/.symlinks/plugin/wifi_connector/ios/Classes/SwiftWifiConnectorPlugin.swift
이 파일이 우리가 개발할 파일이며, Classes 디렉토리 내부에 여러 swift 파일을 만들면서 개발을 진행하면 된다.
wifi_connector/../Pod/wifi_connector.podspec
이 파일은 Podfile과 같이 “내가 플러그인에서 사용할 라이브러리를 정의해 두는 곳” 이라고 생각하면 된다
Podfile과 문법은 약간 다르지만, 대부분이 비슷하며 문서화가 잘 되어있다. - podspec documentation
코드를 살펴보자! method call handling 1 2 3 4 5 6 7 8 public func handle (_ call: FlutterMethodCall, result: @escaping FlutterResult) switch call.method { case "connectToWifi" : self .connectToWifi(call, result) default : result(FlutterMethodNotImplemented ) } }
Flutter 측에서 method channel을 통해 connectToWifi method를 call 하면 이 handle method가 call 된다.
call에는 두가지 property가 존재한다.
method: flutter 쪽에서 call한 method의 이름 (String)
arguments: flutter 쪽에서 method를 call 할때 argument를 넣어줄 수 있는데 그 값을 argument로 전달 받을 수 있다. 보통 String, int, bool, map 등등을 전달 할 수 있다.
result는 callback method이다.
result(String, int, bool, map)등등을 응답으로 보낼 수 있다.
result에 FutterError(code, message, detail), FlutterMethodNotImplemented를 응답으로 보내서 platform exception을 발생 시킬 수 있다. 보통 platform의 error를 flutter 쪽으로 propagate 시키기 위해 사용한다.
connect to wifi 1 2 3 4 5 6 7 8 9 10 11 12 13 14 15 16 17 18 19 20 21 22 23 24 25 26 27 28 29 30 31 32 33 34 35 36 37 38 39 40 41 42 private func connectToWifi (_ call: FlutterMethodCall, _ result: @escaping FlutterResult) guard let argMaps = call.arguments as ? Dictionary <String , Any >, let ssid = argMaps["ssid" ] as ? String , let isWEP = argMaps["isWEP" ] as ? Bool else { result(FlutterError (code: call.method, message: "Missing argument: ssid" , details: nil )) return } var hotspotConfiguration: NEHotspotConfiguration if isWEP { result(FlutterError (code: call.method, message: "WEP is not supported" , details: nil )) return } if let password = argMaps["password" ] as ? String { hotspotConfiguration = NEHotspotConfiguration (ssid: ssid, passphrase: password, isWEP: false ) } else { hotspotConfiguration = NEHotspotConfiguration (ssid: ssid) } hotspotConfiguration.lifeTimeInDays = 1 NEHotspotConfigurationManager .shared.apply(hotspotConfiguration) { (error) in if let error = error { switch error { case NEHotspotConfigurationError .userDenied: result(false ) break case NEHotspotConfigurationError .alreadyAssociated: result(true ) break default : result(FlutterError (code: call.method, message: error.localizedDescription, details: nil )) } } else { result(true ) } } }
이전 글에서 Flutter에서 connectToWifi method를 call 할 때 아래와 같은 방식으로 argument를 넘겨줬다. 1 2 3 static Future<bool > connectToWifi(String ssid, {String password, bool isWEP = false }) async { return await _channel.invokeMethod('connectToWifi' , {'ssid' : ssid, 'password' : password, 'isWEP' : isWEP}); }
이때 넘겨준 argument를 call.arguments를 통해 받을 수 있다.
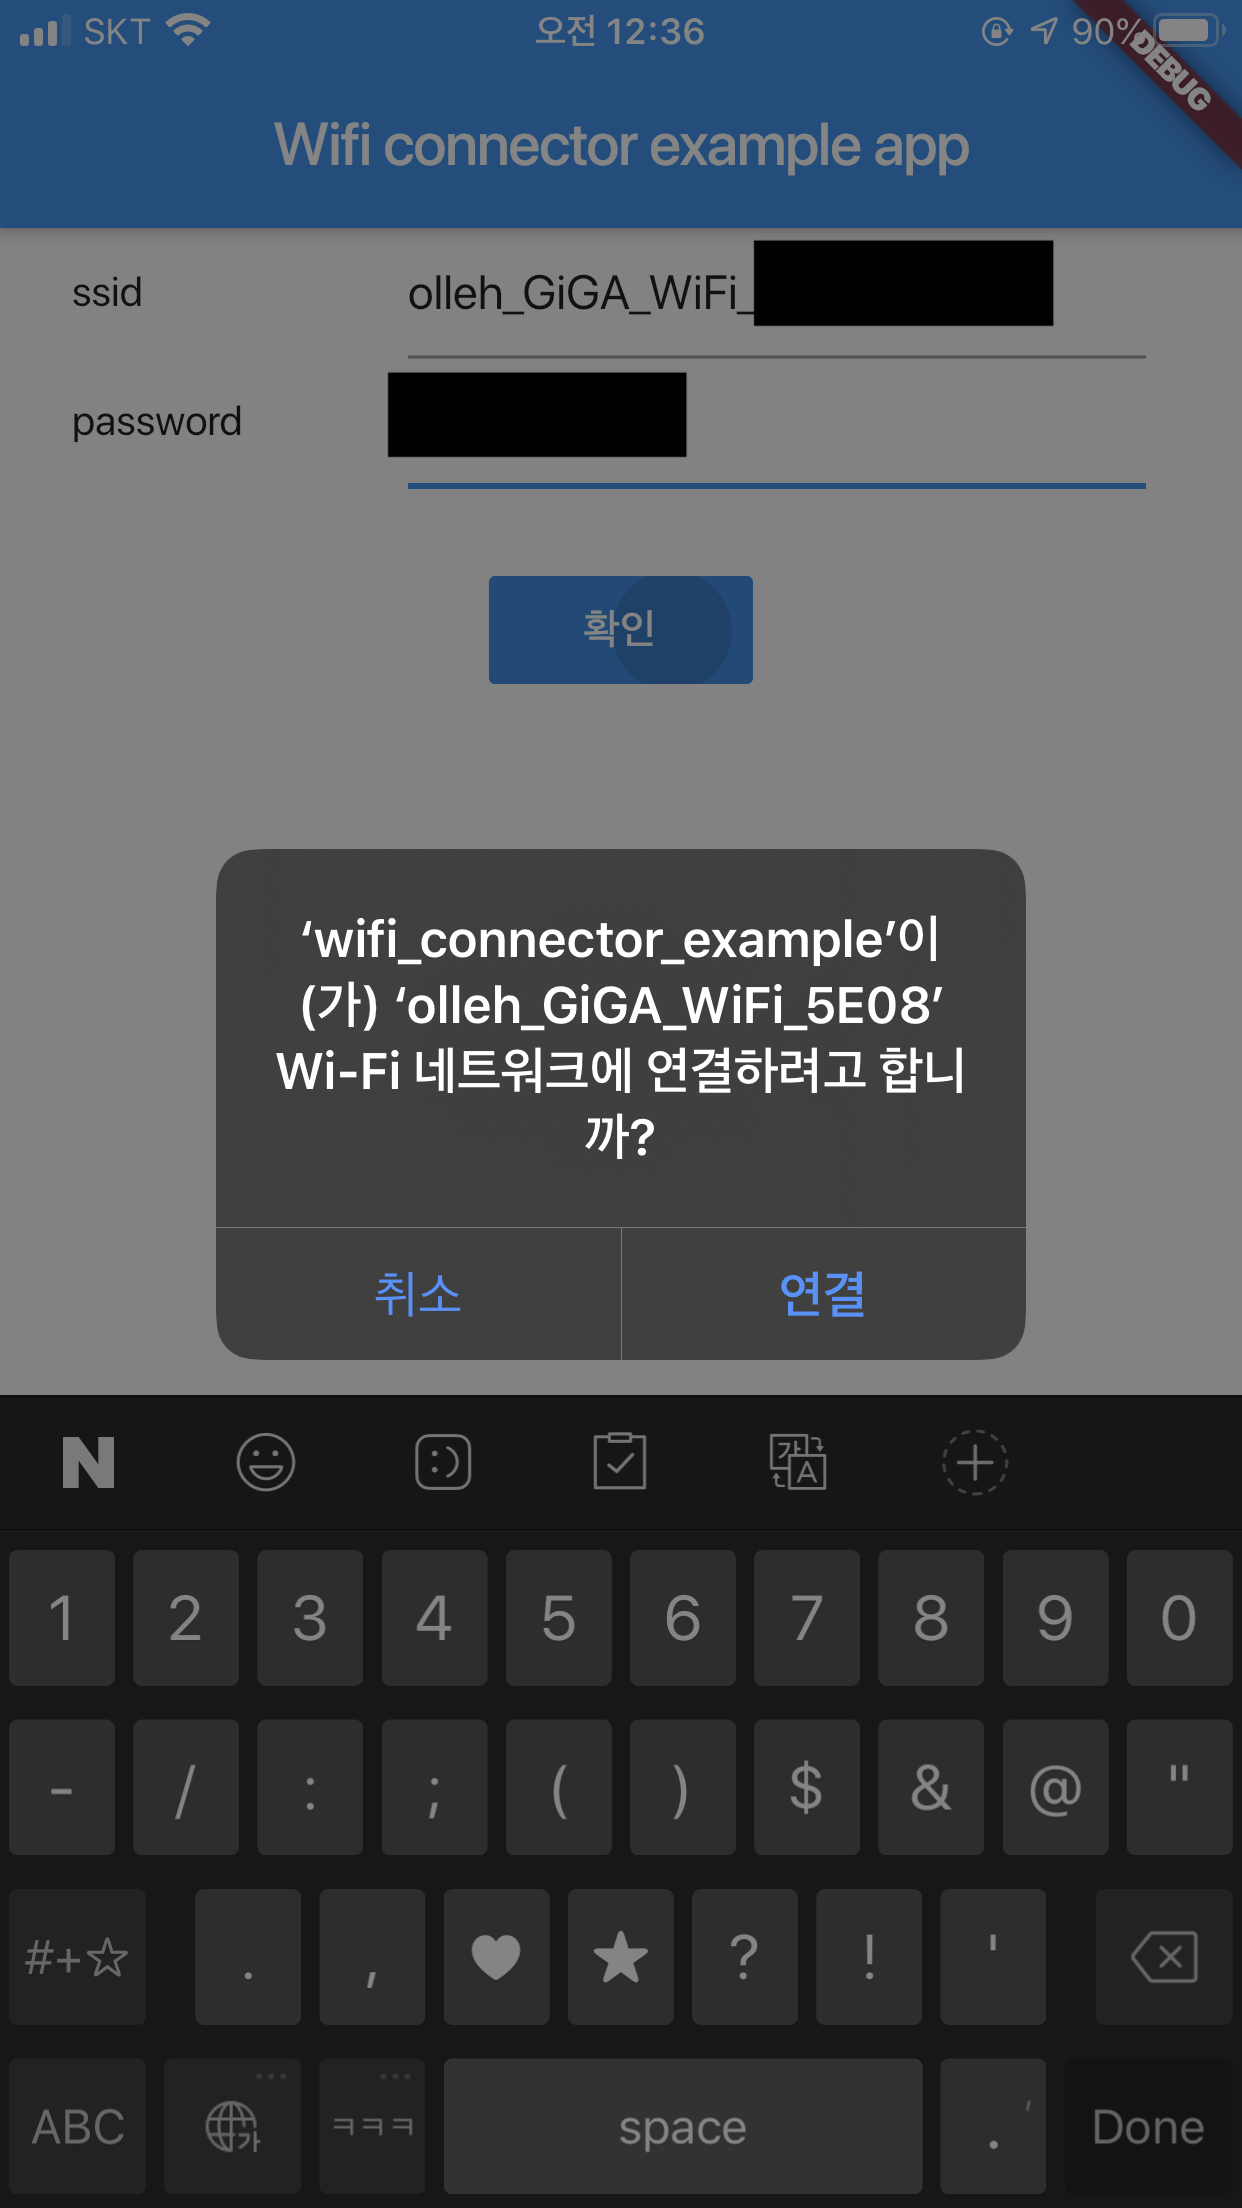
다음 코드들은 ios에서 wifi에 연결을 시도하는 코드이며, 사용자에게 alert가 뜨게된다.
Total code 1 2 3 4 5 6 7 8 9 10 11 12 13 14 15 16 17 18 19 20 21 22 23 24 25 26 27 28 29 30 31 32 33 34 35 36 37 38 39 40 41 42 43 44 45 46 47 48 49 50 51 52 53 54 55 56 57 58 59 60 61 62 63 64 import Flutterimport UIKitimport NetworkExtensionimport SystemConfiguration.CaptiveNetworkpublic class SwiftWifiConnectorPlugin : NSObject , FlutterPlugin public static func register (with registrar: FlutterPluginRegistrar) let channel = FlutterMethodChannel (name: "wifi_connector" , binaryMessenger: registrar.messenger()) let instance = SwiftWifiConnectorPlugin () registrar.addMethodCallDelegate(instance, channel: channel) } public func handle (_ call: FlutterMethodCall, result: @escaping FlutterResult) switch call.method { case "connectToWifi" : self .connectToWifi(call, result) default : result(FlutterMethodNotImplemented ) } } private func connectToWifi (_ call: FlutterMethodCall, _ result: @escaping FlutterResult) guard let argMaps = call.arguments as ? Dictionary <String , Any >, let ssid = argMaps["ssid" ] as ? String , let isWEP = argMaps["isWEP" ] as ? Bool else { result(FlutterError (code: call.method, message: "Missing argument: ssid" , details: nil )) return } var hotspotConfiguration: NEHotspotConfiguration if isWEP { result(FlutterError (code: call.method, message: "WEP is not supported" , details: nil )) return } if let password = argMaps["password" ] as ? String { hotspotConfiguration = NEHotspotConfiguration (ssid: ssid, passphrase: password, isWEP: false ) } else { hotspotConfiguration = NEHotspotConfiguration (ssid: ssid) } hotspotConfiguration.lifeTimeInDays = 1 NEHotspotConfigurationManager .shared.apply(hotspotConfiguration) { (error) in if let error = error { switch error { case NEHotspotConfigurationError .userDenied: result(false ) break case NEHotspotConfigurationError .alreadyAssociated: result(true ) break default : result(FlutterError (code: call.method, message: error.localizedDescription, details: nil )) } } else { result(true ) } } } }
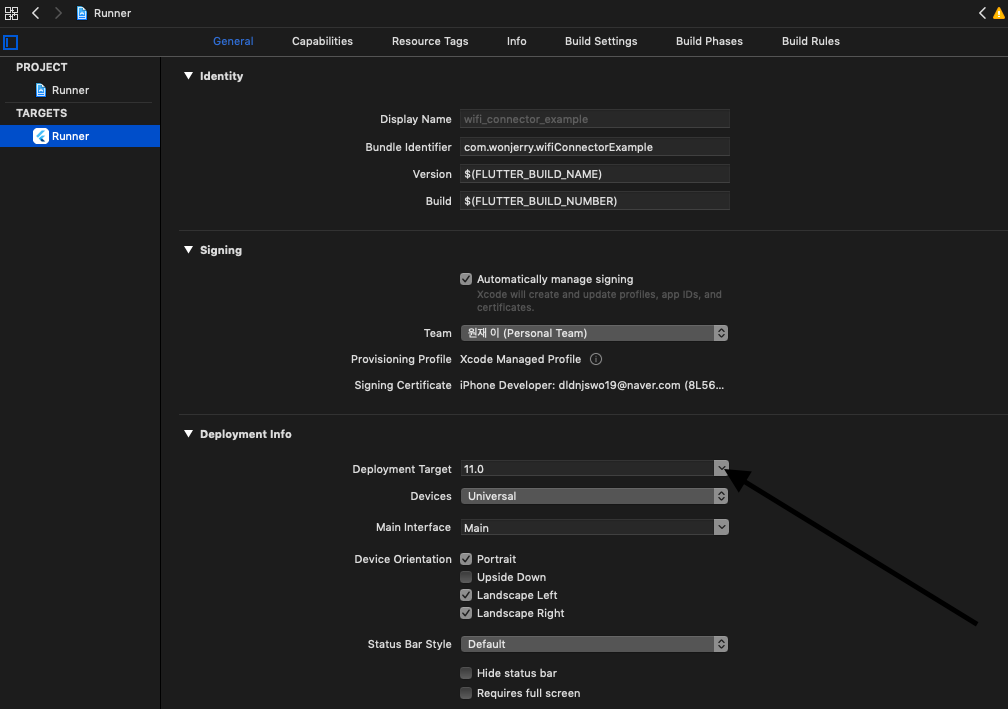
잠깐! 이 코드를 붙여넣기 하면 당연히 에러가 발생할 것 이다. ssid, password를 사용해서 wifi를 연결하기 위해서는 iOS11 버전 이상이어야 하며, Hotspot Configuration Capability가 필요하다.
xcode에서 Runner를 클릭하자
General에서 Development Info > Development target을 11.0으로 설정하자!
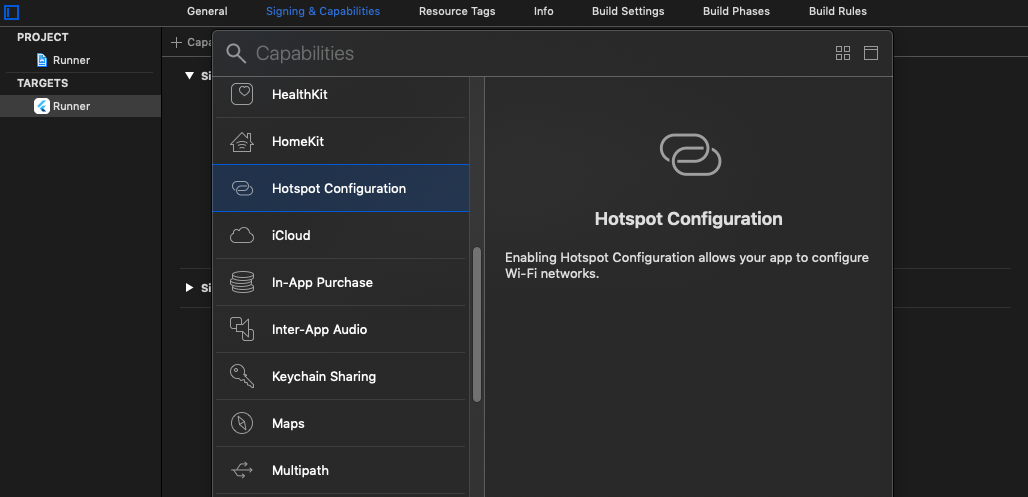
Capability에서 Hotspot Configuration을 켜주자
Plugin의 wifi_connector.pubspec에서 development_target을 11.0으로 설정한다!
1 2 3 4 5 6 7 8 9 10 11 12 13 14 15 16 17 18 19 20 # # To learn more about a Podspec see http://guides.cocoapods.org/syntax/podspec.html # Pod::Spec.new do |s| s.name = 'wifi_connector' s.version = '0.0.1' s.summary = 'A new flutter plugin project.' s.description = <<-DESC A new flutter plugin project. DESC s.homepage = 'http://example.com' s.license = { :file => '../LICENSE' } s.author = { 'Your Company' => 'email@example.com' } s.source = { :path => '.' } s.source_files = 'Classes/**/*' s.public_header_files = 'Classes/**/*.h' s.dependency 'Flutter' s.ios.deployment_target = '11.0' end
자 이렇게 하면 ios쪽 환경 구축 및 코드 구현은 끝났다.
실제로 wifi 연결 시도해보자!
연결이 성공적으로 진행되었다 iOS쪽 구현 완료!
다음 글에서는 android 파트를 구현해보자.